Prewords
I recently watch this very nice movie: Citizenfour, the documentary about Edward Snowden and the NSA surveillance scandal, and was captivated. Apart from the main story line (that we’re all know and familiar of), one of the thing that sparked my interest was the extreme emphasis on operational security and the sophisticated tools Snowden used to protect his communications.
Growing up in the digital age, it’s hard not to share information online. My data was everywhere: social media, apps, cloud services. Like most people, I assumed nobody cared about my boring personal information. Besides, what could I do about it anyway?
But, I do care. And I know that you care, too. That’s why we’re here, isn’t it?
Poll after poll is confirming that, contrary to what we tend to think, people not only care, they care a lot. The problem is we feel disempowered. We feel like we can’t do anything about it, so we may as well not try.
- Snowden, in a public interview on privacy
The need for encryption
I think there are a few reasons why this issue is surfacing in my mind lately.
The amount of exposure I am to the internet is increasing
I’ve been moving my data between platforms more lately: email, messaging apps, cloud storage. Personally, I trust the platform, but not the people behind it. A blackbox service, with system admins holding too much access, and we’re functioning with the hope that they won’t abuse their power - a system built on trust alone.
Sadly, I can’t control who sees my data on these platforms. However, I can control what they see, and I’m just gonna make it harder for them to get me.
Why do I care, if I don’t have anything to hide
But I didn’t do anything wrong. Why would I need to do that if I am innocent? Yeah alright, alright, I know! This phrase comes up in every privacy debate, and there is a very good study on this.. Maybe in another article, we’ll talk more on this. Since you’re here already, let’s move on to the next topic.
Different Encryption Methods
There are two main approaches to encryption, each with distinct use cases:
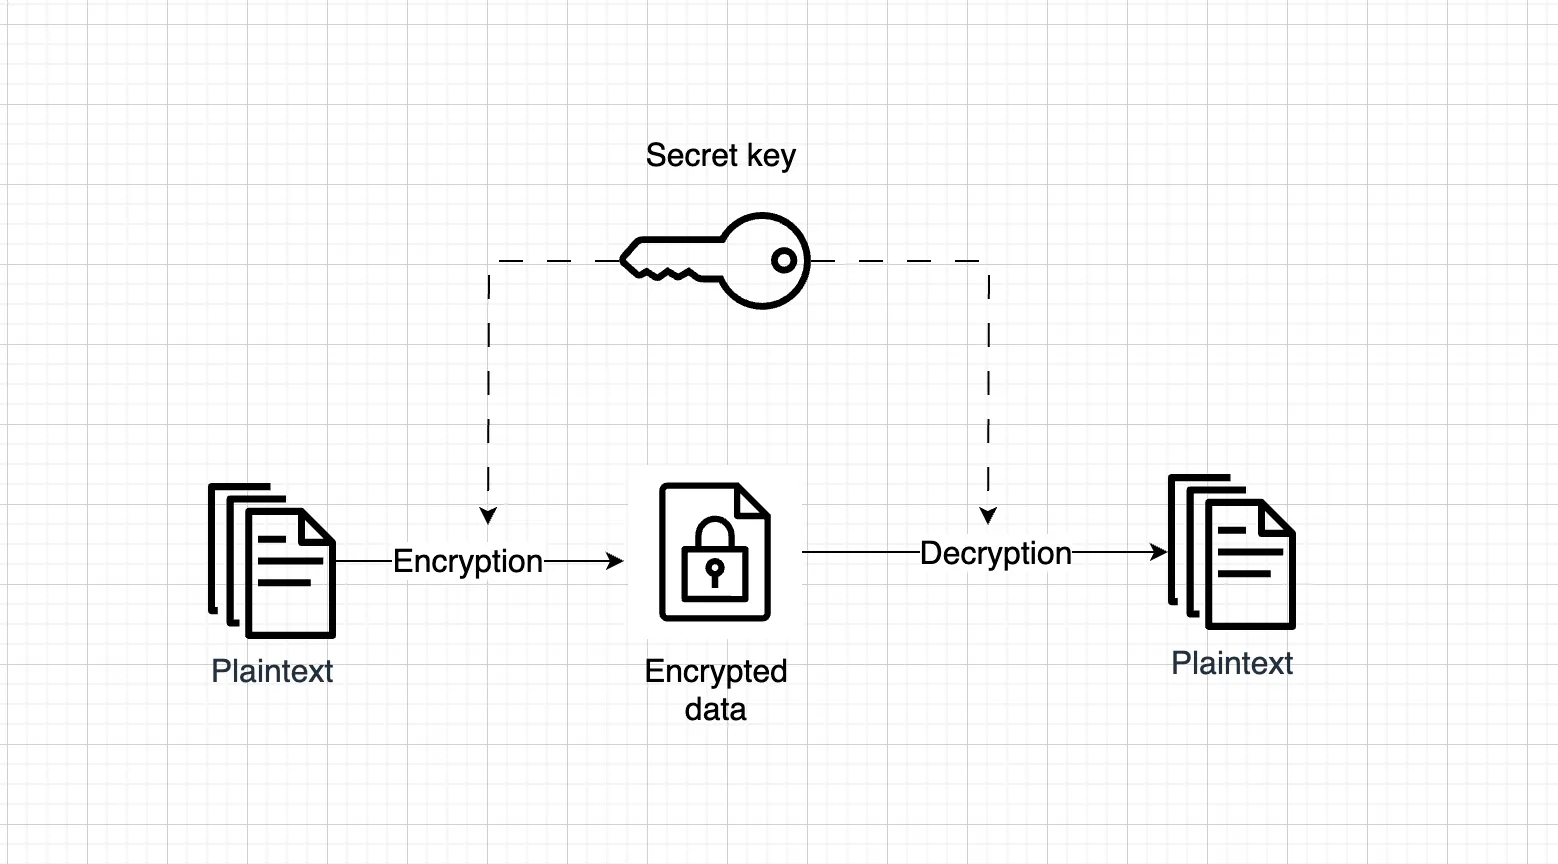
Symmetric Encryption
Symmetric encryption uses the same key for both encryption and decryption. It’s simpler and faster than asymmetric encryption, but requires you to securely share the key with anyone who needs access.
Asymetric encrytion
Asymmetric encryption uses a pair of keys - one public, one private. Anyone can use your public key to encrypt messages, and you can decrypt those messages with your private key. This is perfect for secure communication between parties who’ve never met. This is how Snowden safely contacted the journalists in the movies.

Here is the good news, you don’t need to dig into the technical details of how the encryption algorithm works or understand its mathematical proof. You just need to know a few common encryption methods and decide what fits your use case. There are several tools will handle the heavy work for you.
Using OpenSSL for symmetric encryption
The OpenSSL software library is a robust, commercial-grade, full-featured toolkit for general-purpose cryptography and secure communication. Let’s see a simple symmetric encryption process using OpenSSL.
The openssl usually comes pre-installed in most Linux distributions.
$ openssl command [ command_options ] [ command_arguments ]In this guide, we will only discuss to encrypting aspect of openssl, that is, the enc command.
// To encrypt the data$ openssl enc -ciphername -in un_encrypted.data -out encrypted.data// To decrypt the data$ openssl enc -d -ciphername -in encrypted.data -out un_encrypted.dataNotes:
- You can get a list of
ciphernameusing this commandTerminal window $ openssl list -cipher-algorithms - Currently, the default key derivation is deprecated, so there might be a message like this
You can just add
Terminal window ...Verifying - enter AES-128-CBC encryption password:*** WARNING : deprecated key derivation used.Using -iter or -pbkdf2 would be better....-pbkdf2as the software suggested. - By default, the output file will be in binary. If you prefer to copy/paste it instead, then you will need to encode it using the
-base64flag - When refering to the “password”, we are talking about the your “private key”.
- Critical point: decryption requires the exact same settings (flags) you used for encryption. Change one flag, and your data stays locked. So you better remember, not just your private key, but the entire command with all its flags that you used to encrypt your data.
Real life example with OpenSSL
Let’s look at a real life example: you have a file myfile.txt that you need to encrypt. The whole process looks like this:
$ echo "This is a message" >> data.in$ openssl enc -aes-128-cbc -in data.in -out encrypted.out -base64 -pbkdf2enter AES-128-CBC encryption password: <Enter-your-password-here>Verifying - enter AES-128-CBC encryption password: <Re-enter-your-password-here>$ cat encrypted.outU2FsdGVkX1/DTLJYX2liu9E3MhcTqcg2DdPeDyrUnsBdigJz24YMwlT1BdIsKXSATo decrypt the message:
$ openssl enc -d -aes-128-cbc -in encrypted.out -out decrypted.out -base64 -pbkdf2enter AES-128-CBC decryption password:$ cat decrypted.outThis is a messageAnd once again, you must use the same encryption parameters when decrypting. It might be a good idea to document your full command history.
Using GPG for asymetric encryption
GPG (GNU Privacy Guard, not to be confused with Pretty Good Privacy) is the free, open-source implementation of the OpenPGP standard for public-key cryptography. It’s a complete toolkit for public-key cryptography that handles the complex hybrid encryption process automatically. In this guide, we will walk through some core functionality: keypair creation, exchanging and verifying keys, encrypting and decrypting documents, and authenticating documents with digital signatures.
There are generally 4 key ideas that you need to be familiar with:
- How to generate your own key pair (public + private)
- How to send your key pair to the receiver.
- How to import the public key of the receiver.
- How to encrypt the file using the receiver’s public key.
First, you need to know how to generate your key pair (both public and private keys)
$ gpg --gen-keyGPG will walks you through creating your identity—name, email, and passphrase.
After that, you need to exchange the public keys with the person you want to communicate. To list the keys use this command --list-keys.
$ gpg --list-keysgpg: checking the trustdbgpg: marginals needed: 3 completes needed: 1 trust model: pgpgpg: depth: 0 valid: 2 signed: 0 trust: 0-, 0q, 0n, 0m, 0f, 2ugpg: next trustdb check due at 2028-05-23[keyboxd]---------pub ed25519 2025-05-24 [SC] [expires: 2028-05-23]uid [ultimate] real name <email.address@test.com>sub cv25519 2025-05-24 [E] [expires: 2028-05-23]In order to send your public key to your contact, you must first export it to a file. This is done using the flag --export with specific email of the key.
$ gpg --export email.address@test.com --output my_public_key.gpgThe key will be output in my_public_key.gpg in a binary format, but this can be inconvenient if you prefer to copy/paste the content. GnuPG therefore supports a command-line option --armor that that causes output to be generated in an ASCII-armored format similar to encoded documents.
$ gpg --export --armor email.address@test.com-----BEGIN PGP PUBLIC KEY BLOCK-----[...]-----END PGP PUBLIC KEY BLOCK-----
// If you want write the output to a file use this instead$ gpg --export --armor email.address@test.com > my_public_key.gpg
Note here that GPG’s --output flag doesn’t work with --export, so you’ll have to use the > redirect instead.
Next, to import a public GPG key of the receiver
$ gpg --import receiver.gpggpg: key 9E98BC16: public key importedgpg: Total number processed: 1gpg: imported: 1You can use the --list-keys command to view the imported keys too. Usually, your own keys will have the tag [ultimate] due to it being generated on your side, the receiver will have the tag [unknow] since we only have the their public key.
Real life example with GPG
Let’s say you are hiding the files that you just stole from CIA in document.pdf, to encrypt this file
$ gpg --output document.gpg --encrypt --recipient receiver@email.com document.pdfThis creates document.gpg. GPG automatically:
- Uses receiver’s public key to encrypt a random AES key.
- Uses that AES key to encrypt your actual file.
- Bundles everything together.
Note: Don’t panic at “marginal trust” message. GPG is telling you it hasn’t verified receiver’s identity through its web of trust system.
To decrypt a document you received
$ gpg --output doc --decrypt doc.gpg
You need a passphrase to unlock the secret key foruser: "TestUser (Executioner) <test@email.com>"1024-bit ELG-E key, ID 5C8CBD41, created 1999-06-04 (main key ID 9E98BC16)
Enter passphrase:
When a file is encrypted, GPG embeds the key ID of the recipient’s public key in the encrypted file’s metadata. That’s why during decryption, you don’t need to specify which key to use.
It’s crucial to understand that even though your private key is stored by GPG, it is encrypted by your passphrase. So if you fail to remember the passphrase, your data will be locked forever.
Everything Not Saved Will Be Lost
- Nintendo quit screen message